
Tools & Treasures
New construction ideas, tips, tricks, samples, etc.
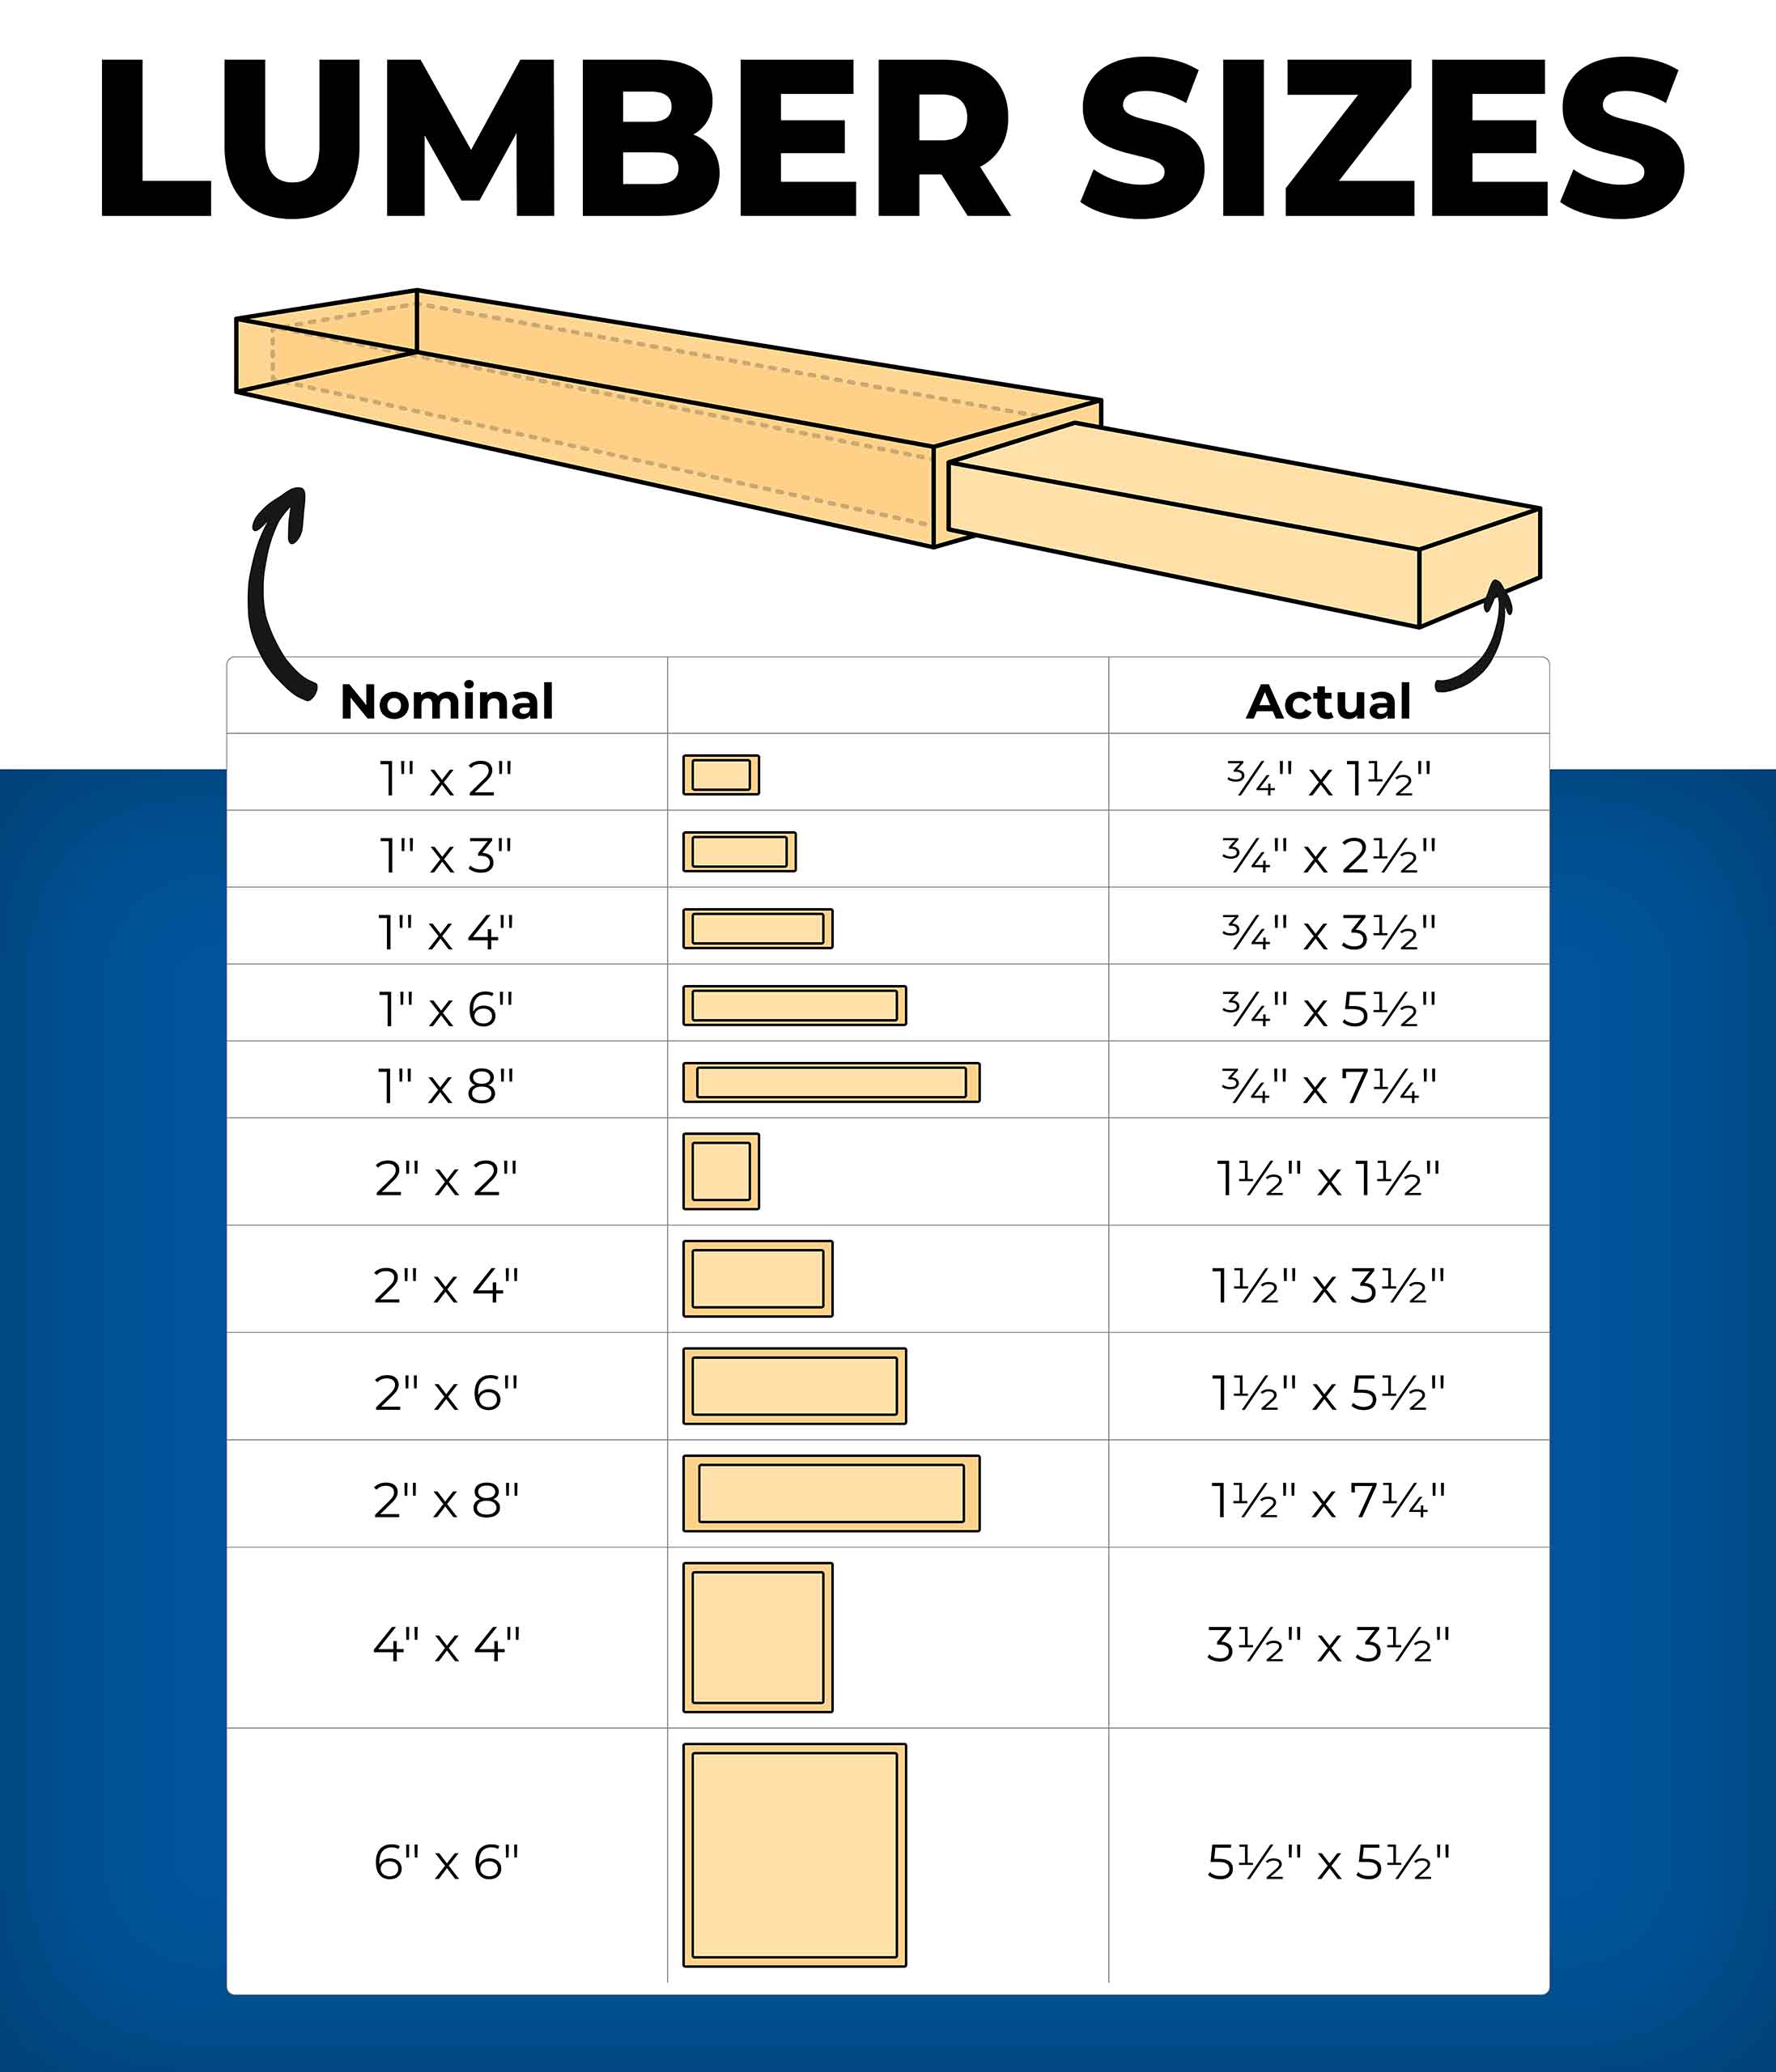
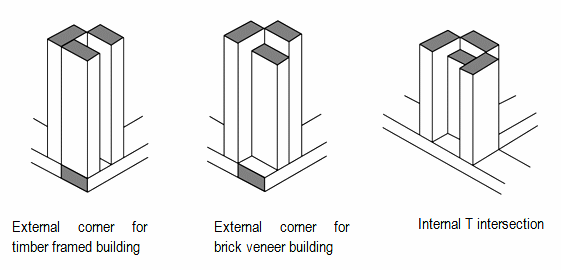
Nominal vs. Actual Lumber Dimensions
Lumber sizes are usually given in “nominal” measurements. The nominal measurements are a board’s size before it has been planed smooth (surfaced) on all 4 sides. The actual measurements are the final size. Actual sizes may vary slightly due to the moisture content.
| Nominal Size | Actual Size | Nominal Size | Actual Size | Nominal Size | Actual Size |
| 1×2 | 3/4″ x 1-1/2″ | 2×2 | 1-1/2″ x 1-1/2″ | 4×4 | 3-1/2″ x 3-1/2″ |
| 1×3 | 3/4″ x 2-1/2″ | 2×3 | 1-1/2″ x 2-1/2″ | 4×6 | 3-1/2″ x 5-1/2″ |
| 1×4 | 3/4″ x 3-1/2″ | 2×4 | 1-1/2″ x 3-1/2″ | 6×6 | 5-1/2″ x 5-1/2″ |
| 1×5 | 3/4″ x 4-1/2″ | 2×6 | 1-1/2″ x 5-1/2″ | 5/4×6 | 1″ x 5-1/2″ |
| 1×6 | 3/4″ x 5-1/2″ | 2×8 | 1-1/2″ x 7-1/4″ | 8×8 | 7-1/4″ x 7-1/4″ |
| 1×8 | 3/4″ x 7-1/4″ | 2×10 | 1-1/2″ x 9-1/4″ | ||
| 1×10 | 3/4″ x 9-1/4″ | 2×12 | 1-1/2″ x 11-1/4″ | ||
| 1×12 | 3/4″ x 11-1/4″ |
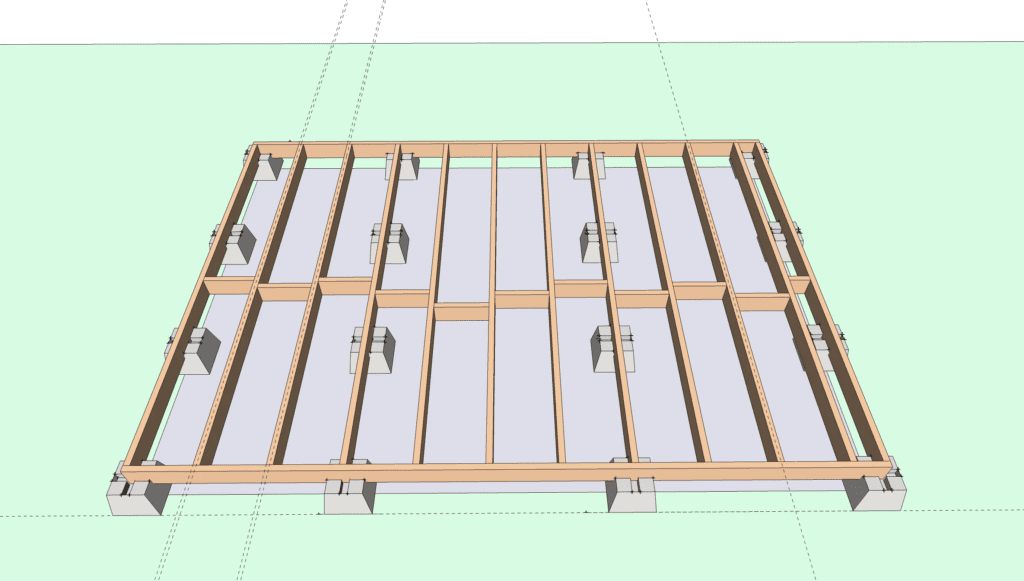
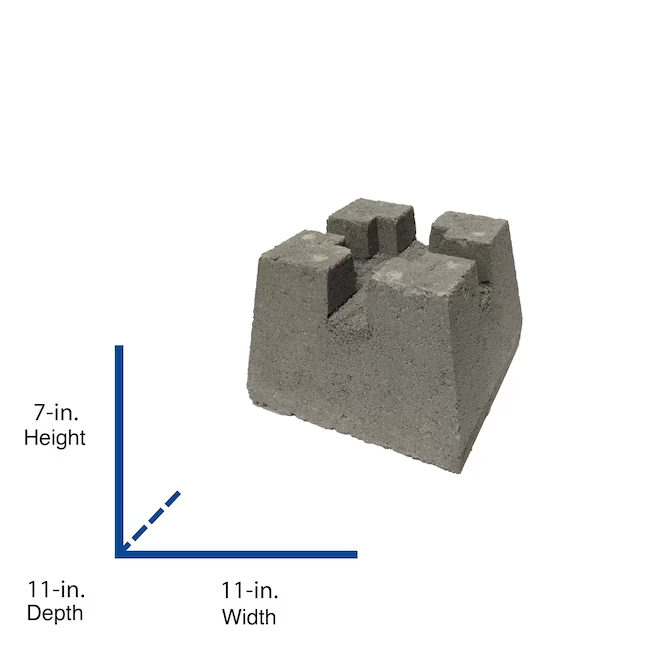
The grooves in a standard deck block are typically around 1.5 inches wide and 1.5 inches deep, designed to securely hold a 2×4 or 2×6 joist, depending on the specific deck block design; the post-receiving hole in the center of the block is usually sized to fit a 4×4 post.
Key points about deck block grooves:
To ensure the peak of your plexiglass-covered chicken run is watertight, here are a few good options:
A polycarbonate or metal ridge cap is the best option for sealing the peak. These are designed to bridge the gap between sloped panels and prevent leaks. You can find them in clear or tinted polycarbonate to match your plexiglass.
If a ridge cap isn’t an option, you can slightly overlap the plexiglass sheets at the peak:
For a cleaner look, you can use H-channel or U-channel connectors (typically made of polycarbonate or aluminum) to bridge the gap. These:
If you’re using a wooden ridge beam under the peak, you can:
Use EPDM or butyl waterproof tape along the joints for extra sealing.
Attach flashing (aluminum or polycarbonate) over the peak.
Top 10 Ideas for a Predator-proof Chicken Coop
Written byJoseph Truini
Chicken rearing can be a great hobby, but protecting your flock from predators can be challenging. This is especially true considering that both chicken and their eggs are prey for a wide range of predators. From hawks and eagles to land predators like raccoons, coyotes, foxes, bobcats, weasels’ skunks, snakes, and even neighbourhood dogs, chickens have many hungry enemies. Worse, it can take only one voracious predator to wipe out your entire flock. The best way to avoid the heartbreak of losing any of your beloved birds is to make your chicken coop predator-proof. Here are 10 ways and tips to secure your chicken coop and protect your flock against predators.
Raising your chicken coop off the ground offers a host of worthwhile benefits. Besides naturally protecting your flock from burrowing animals, elevating your coop prevents moisture buildup and wood rot, which can create access points into the coop. Preventing moisture buildup also helps the wood last longer.
Ideally, you want to raise your coop at least 12 inches off the ground. The space underneath provides extra space for your chickens to roam and scratch while offering shelter from aerial predators, inclement weather, and the afternoon sun.
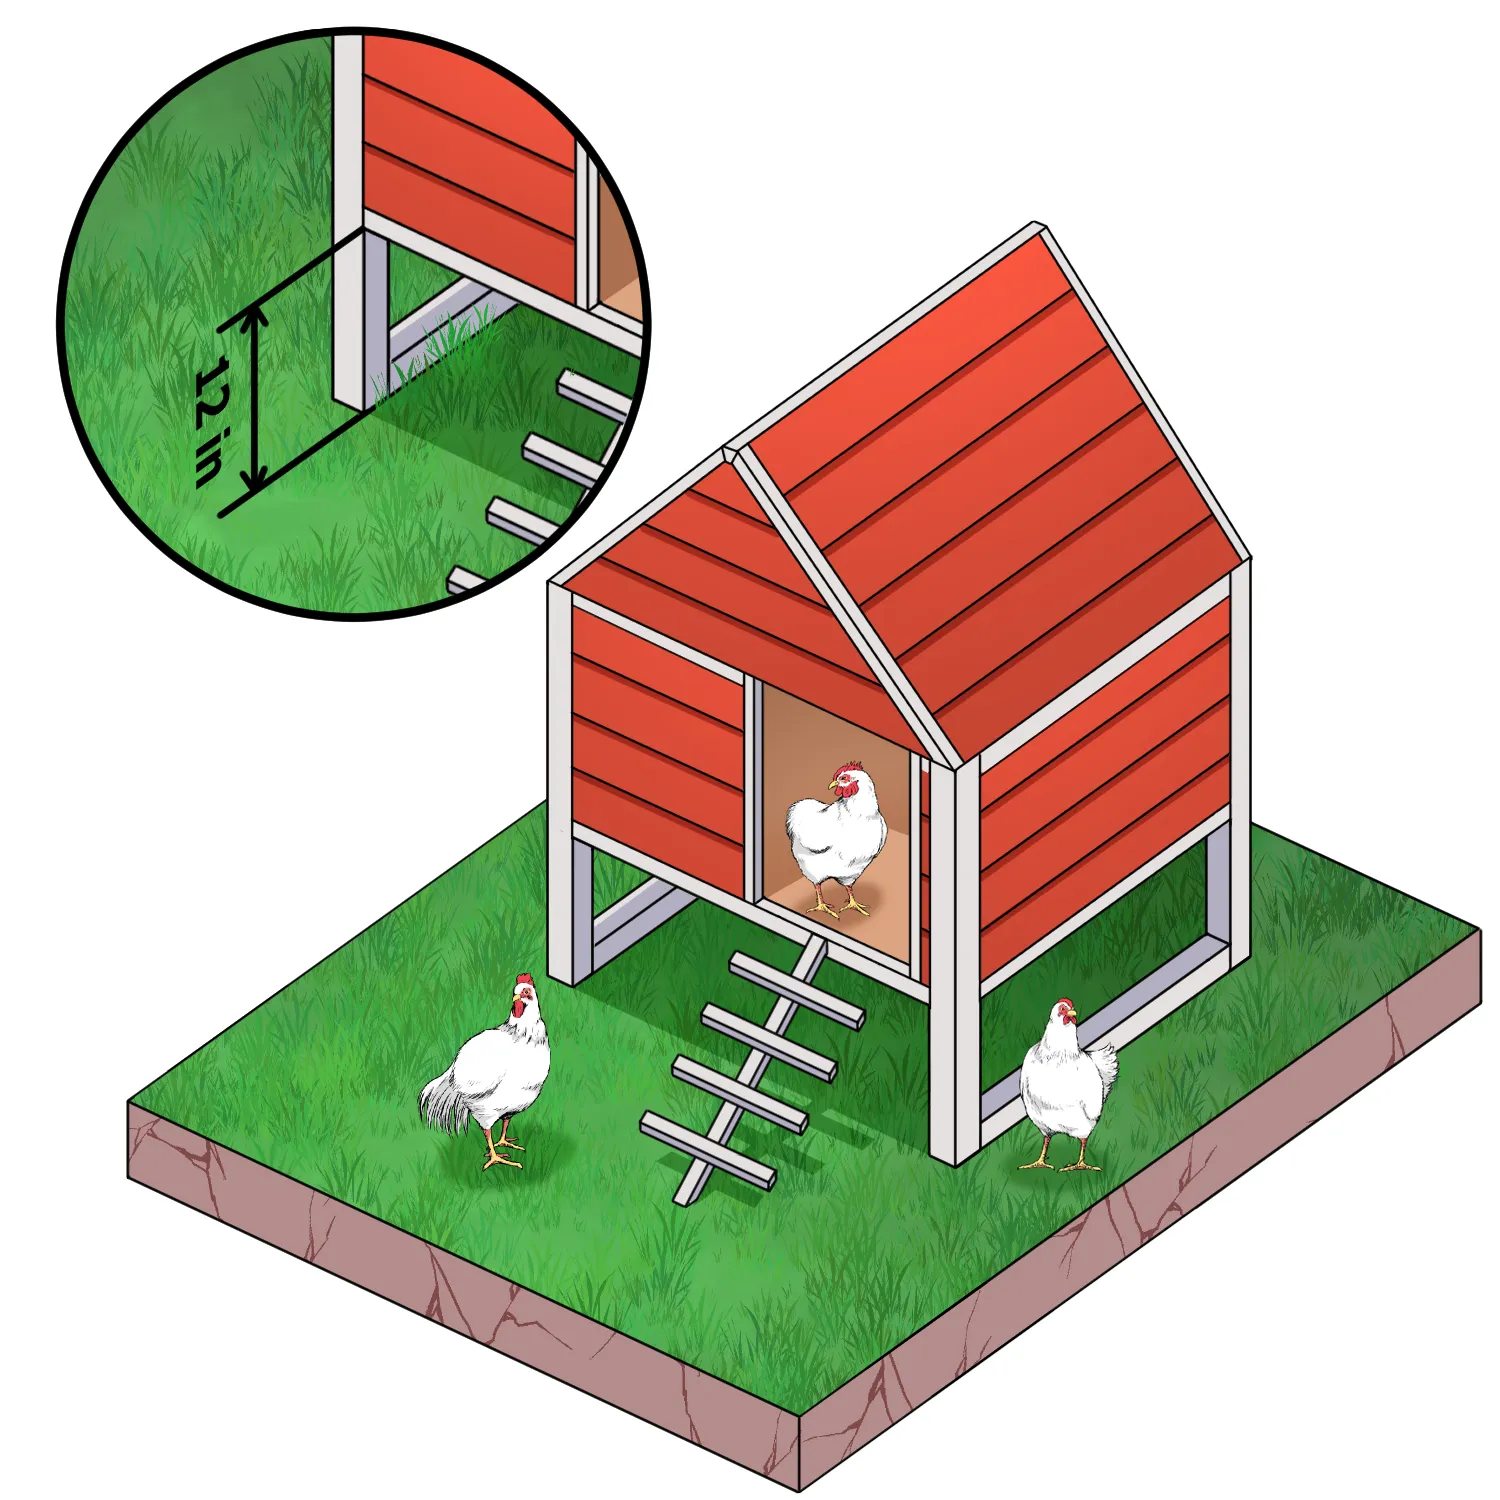
Notably, no matter how high you raise your coop, you will still need solid flooring to ensure predators that can take unorthodox approaches can’t break into the coop from underneath.
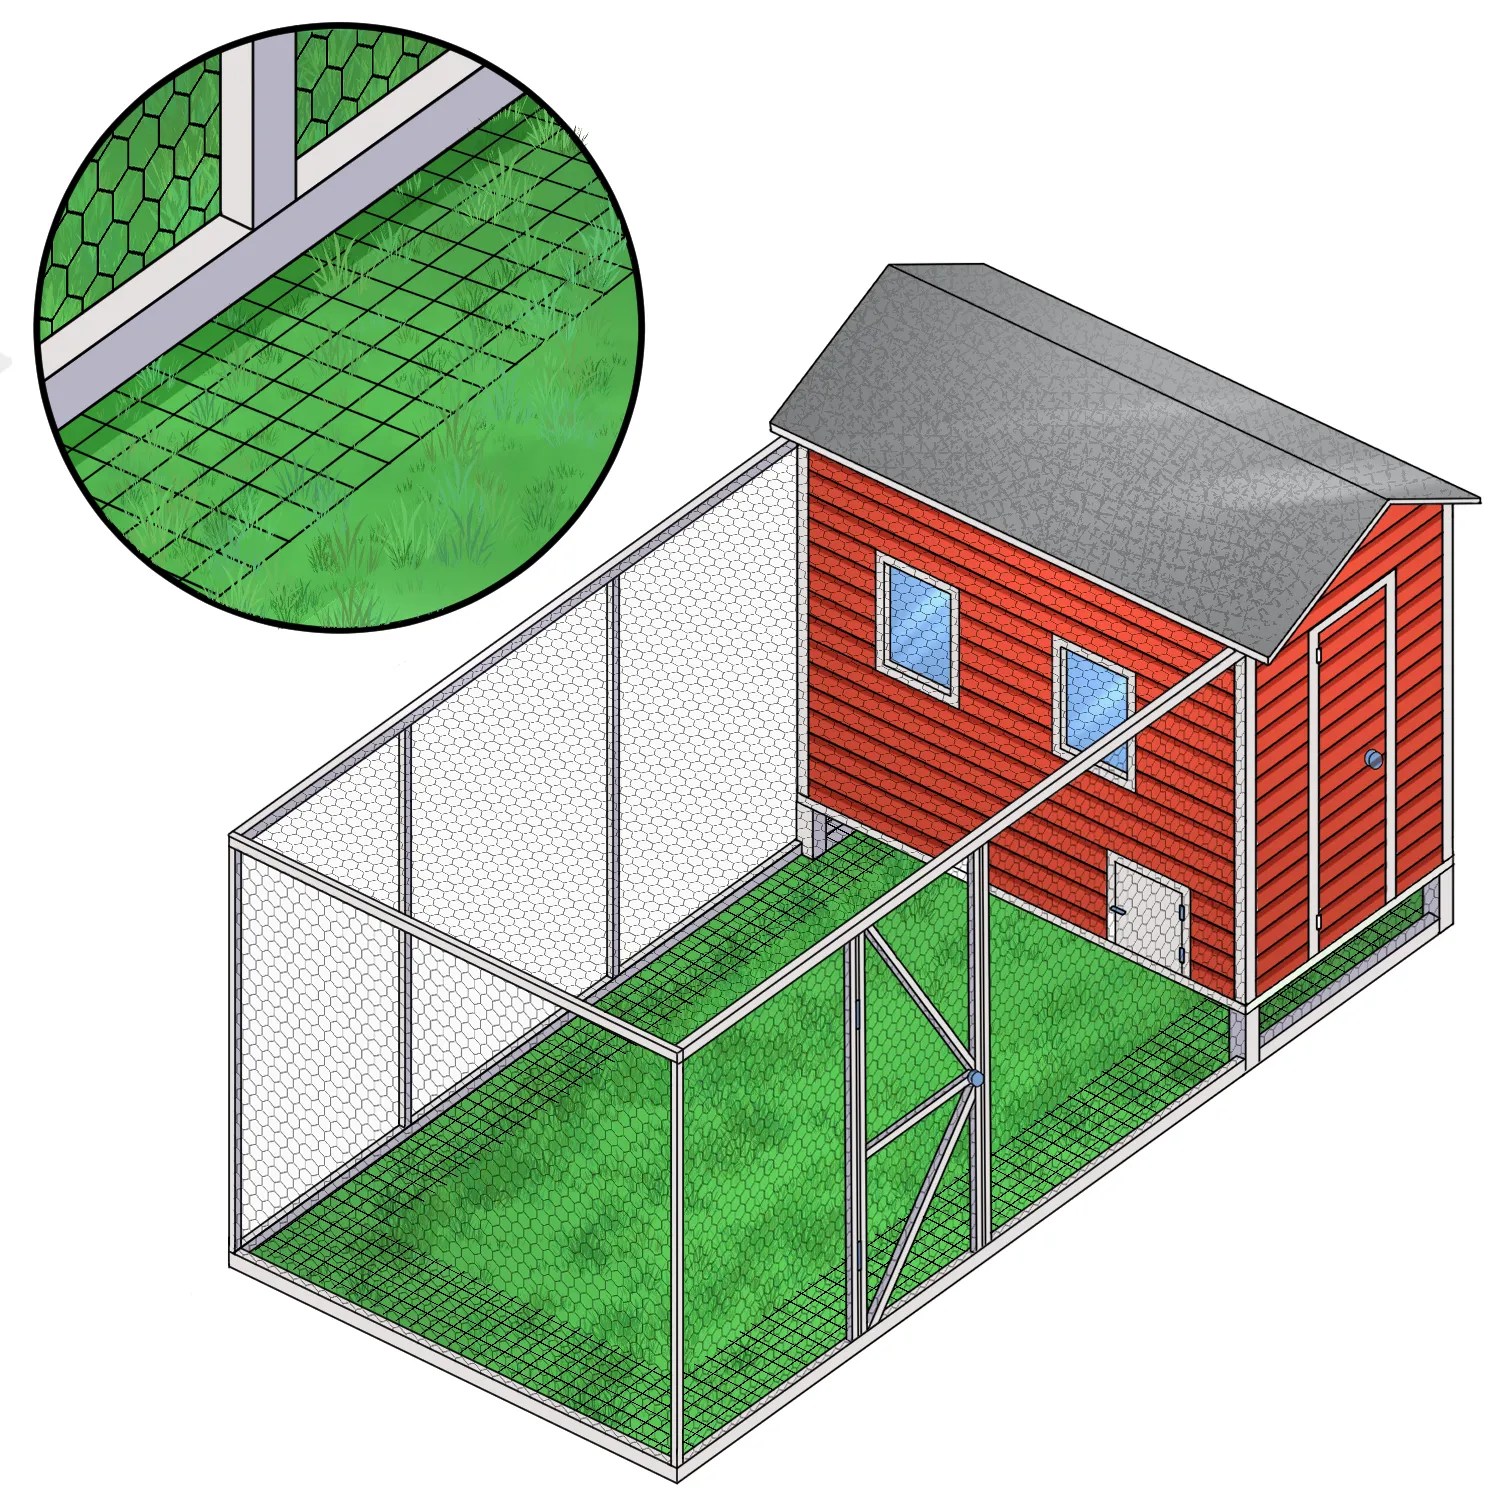
While the chicken wire is a more economical choice for constructing chicken runs, it doesn’t stand up well against many predators. Simply, it is designed to keep chickens in, not predators out. That’s why you should consider hardware cloth wherever you would use chicken wire. This includes on windows, the run, and around the bottom of the coop.
Hardware cloth is rigid to deter raccoons and foxes and has small openings so hawks can’t reach chickens with their talons. The small openings also help keep snakes and members of the weasel family from burrowing and breaking into the coop or running.
Having a concrete or any other deterrent floor can keep predators from digging into the coop, but what about the run where your chickens spend their daytime? To outsmart sly predators like foxes, bobcats, and raccoons, install a predator apron around the perimeter of your chicken run: dig a 12-inch-deep trench around the coop and run, and then bury the hardware cloth in the ground.
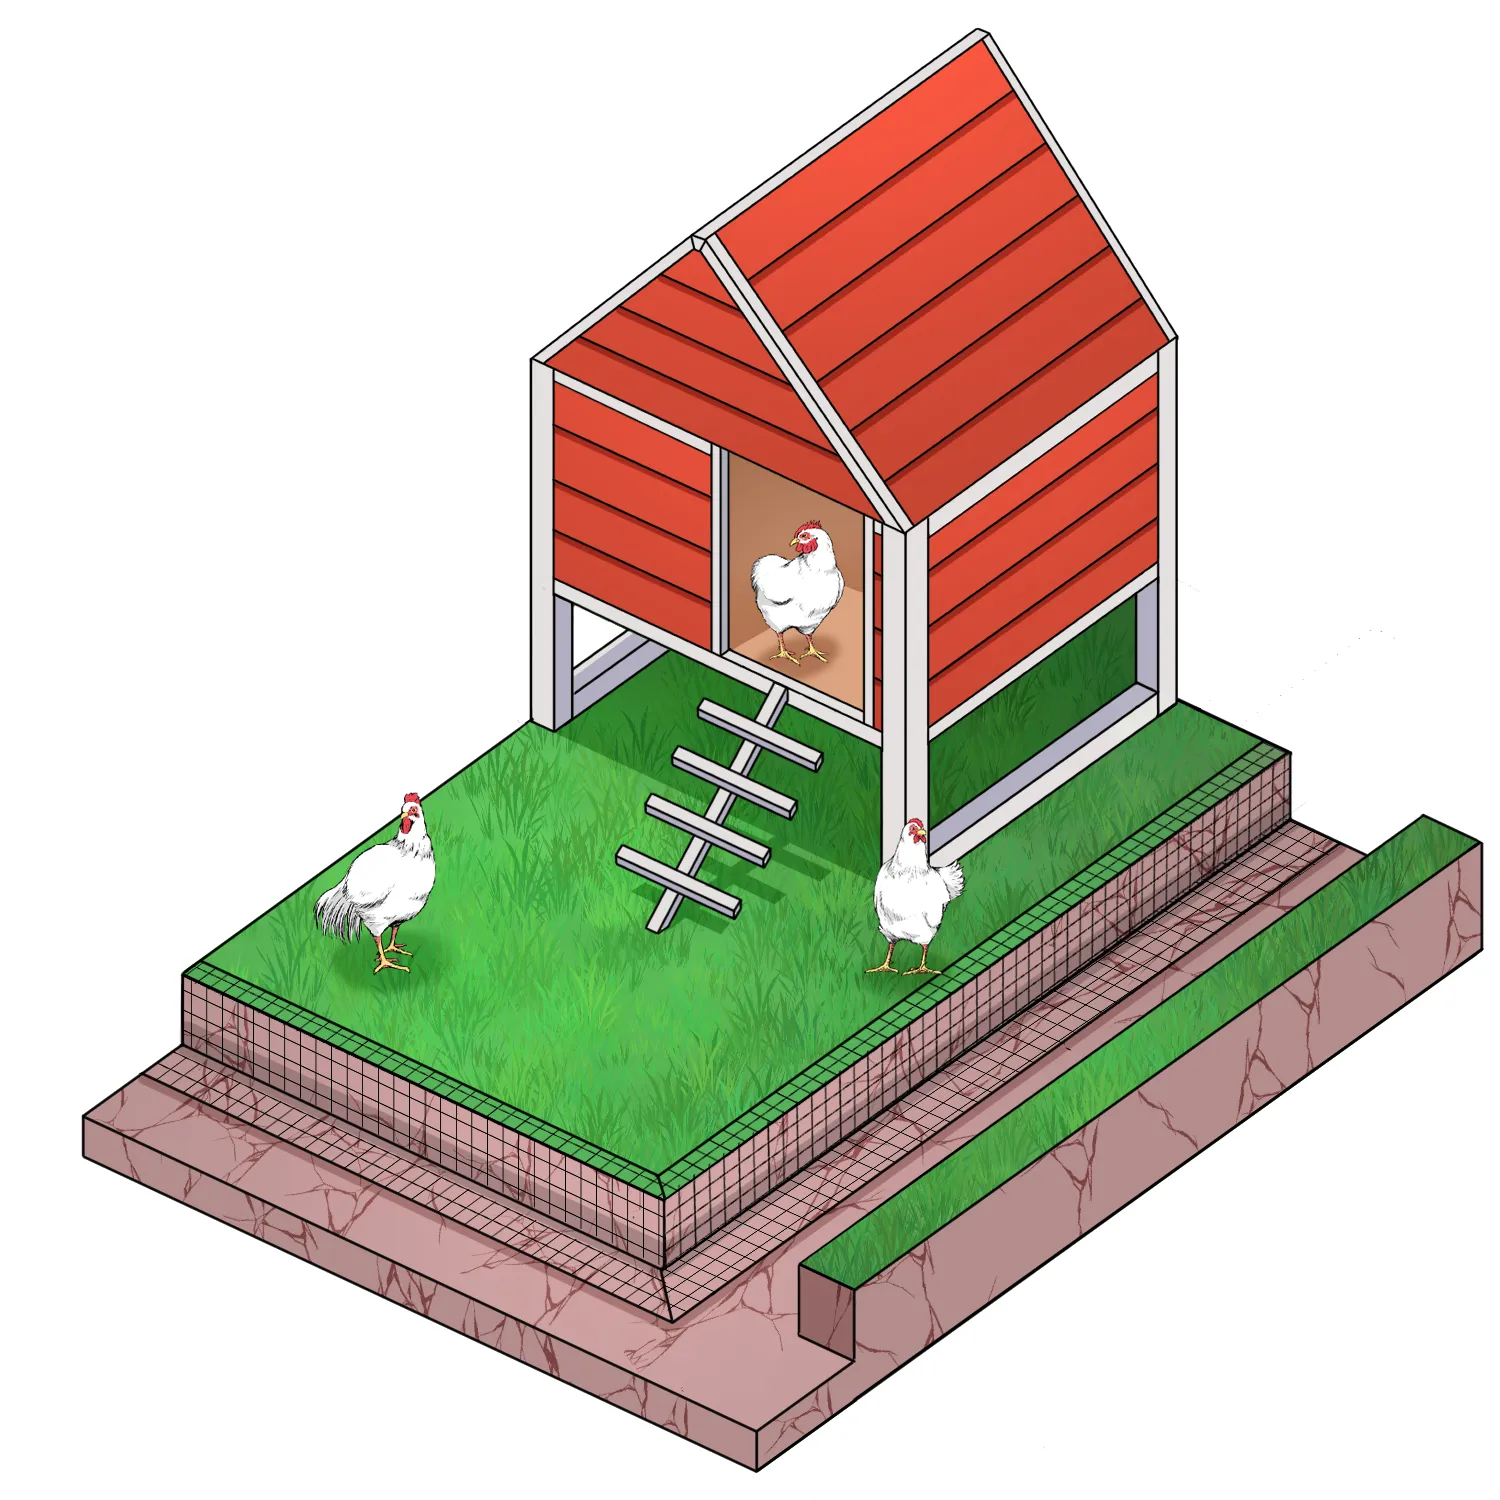
This won’t stop cunny predators from digging, but it will keep them from getting into the run or coop. Because predators can’t see the buried hardware cloth, they will start to dig until they encounter the formidable barrier. Without the hardware-cloth apron, predators can possibly dig into the run and prey on your chickens or their eggs.
Ensuring the security of your chickens encompasses safeguarding them from aerial as well as ground-based threats. Covering the run significantly mitigates the risk posed by these predators, whether you reside in urban or rural settings.
A covered run acts as a deterrent against flying and climbing predators like eagles, hawks, falcons, and owls. Utilizing a solid roof or a covering of hardware cloth is advocated for optimal protection. Budget-conscious poultry enthusiasts might opt for stringing netting across the top of the run, although it’s less effective against climbing predators capable of chewing through the netting.
In scenarios where the threat level is pronounced, amplifying the security measures is a logical step. For those managing small to medium chicken coops, enveloping the entire floor of the run with hardware cloth provides an additional tier of predator-proof protection. While this method may stretch your budget, it serves as a robust defense against the anguish associated with losing your birds to predators. For larger runs, a cost-effective alternative could be laying down hardware cloth a few feet around the inside perimeter of the run, instead of covering the entire floor, providing a substantial level of protection without incurring excessive expenses.
The amalgamation of covering both the top and the bottom of the run, perhaps coupled with a predator proof chicken coop, substantially enhances the safety of your flock, forming a fortified haven against the myriad of predators lurking around.
The idea is to fully protect your birds from predators, including the sly ones, which can take unconventional approaches. All in all, you should ONLY commit to covering the entire floor with hardware cloth if it is absolutely necessary.
Nocturnal predators can appear anytime after dusk and prey on your beloved feathered friends. To protect your flock from diurnal predators that might hunt until late evening and nocturnal predators that might begin hunting prematurely, close and lock the coop and run doors as soon as all your birds have entered their coop.
When you are away from home and not able to lock up the coop and run at dusk, take advantage of modern technology. There is no shortage of automatic coop doors that you can program to suit your needs.
Notably, even with an automatic coop door, it is imperative always to check your coop when back home to ensure all the birds are in and secured. An opossum can come in at dusk and deliberately hide in the run to wait to treat itself in the morning.
The prime idea behind predator-proofing your chicken coop is to protect your flock against attacks. So, along with securing your coop, it is also crucial to avoid things that might attract predators to your coop.
One of the things that attract a variety of predators and pests to your coop is chicken feed. Finding a safe place outside the coop to keep the chicken feed at night can help minimize threats. Alternatively, you can use treadle feeders, which conceal the feed, lowering the temptation for rodents and other egg predators to come in.
If you’re fond of feeding your chickens treats, check and clean up any scraps your birds don’t eat.
To the surprise of many, pets can give your chicken much-needed protection. Geese, guineas, donkeys, llamas, some breeds of dogs, and even roosters have a reputation for being excellent flock guardians.
You can take advantage of these guardian animals to protect your flock. Roosters can sacrifice their own life battling a predator to protect their hens. On the other hand, a guardian dog will naturally spend time patrolling your property and bark at any predator that shows up to scare it away as it alerts you.
For chicken growers considering a guardian dog, Great Pyrenees, Maremmas, Anatolian Shepherds, and Akbash have excellent guarding instincts. You want to be cautious not to adopt a dog that will prey on your chickens instead of protecting them.
If you live in rural areas where livestock codes are relatively forgiving, you will have a wide range of options regarding what guardian animals you can keep.
Chickens are more vulnerable when asleep. Thankfully, they instinctively sleep off the ground. Furnishing your chicken coop with enough roosting bars can ensure that your birds remain safe, even if predators make it into the coop. Besides, indoor roosts ensure your chickens are not tempted to roost outside, where they can be easy prey.
Even with roosts, you will want to train your chickens to retreat into the coop as the daylight fades, as a number of predators are usually active at this time. And as with training other pets, training chickens is based on a reward system. Reward your birds with feed or treats in the evening to encourage them to return to the coop some minutes before nightfall. It won’t take long before they learn to flock to their home at dusk.
Some predators, like raccoons, are intelligent and adept at opening latches and simple locks. Yes, they have mastered how latches work.
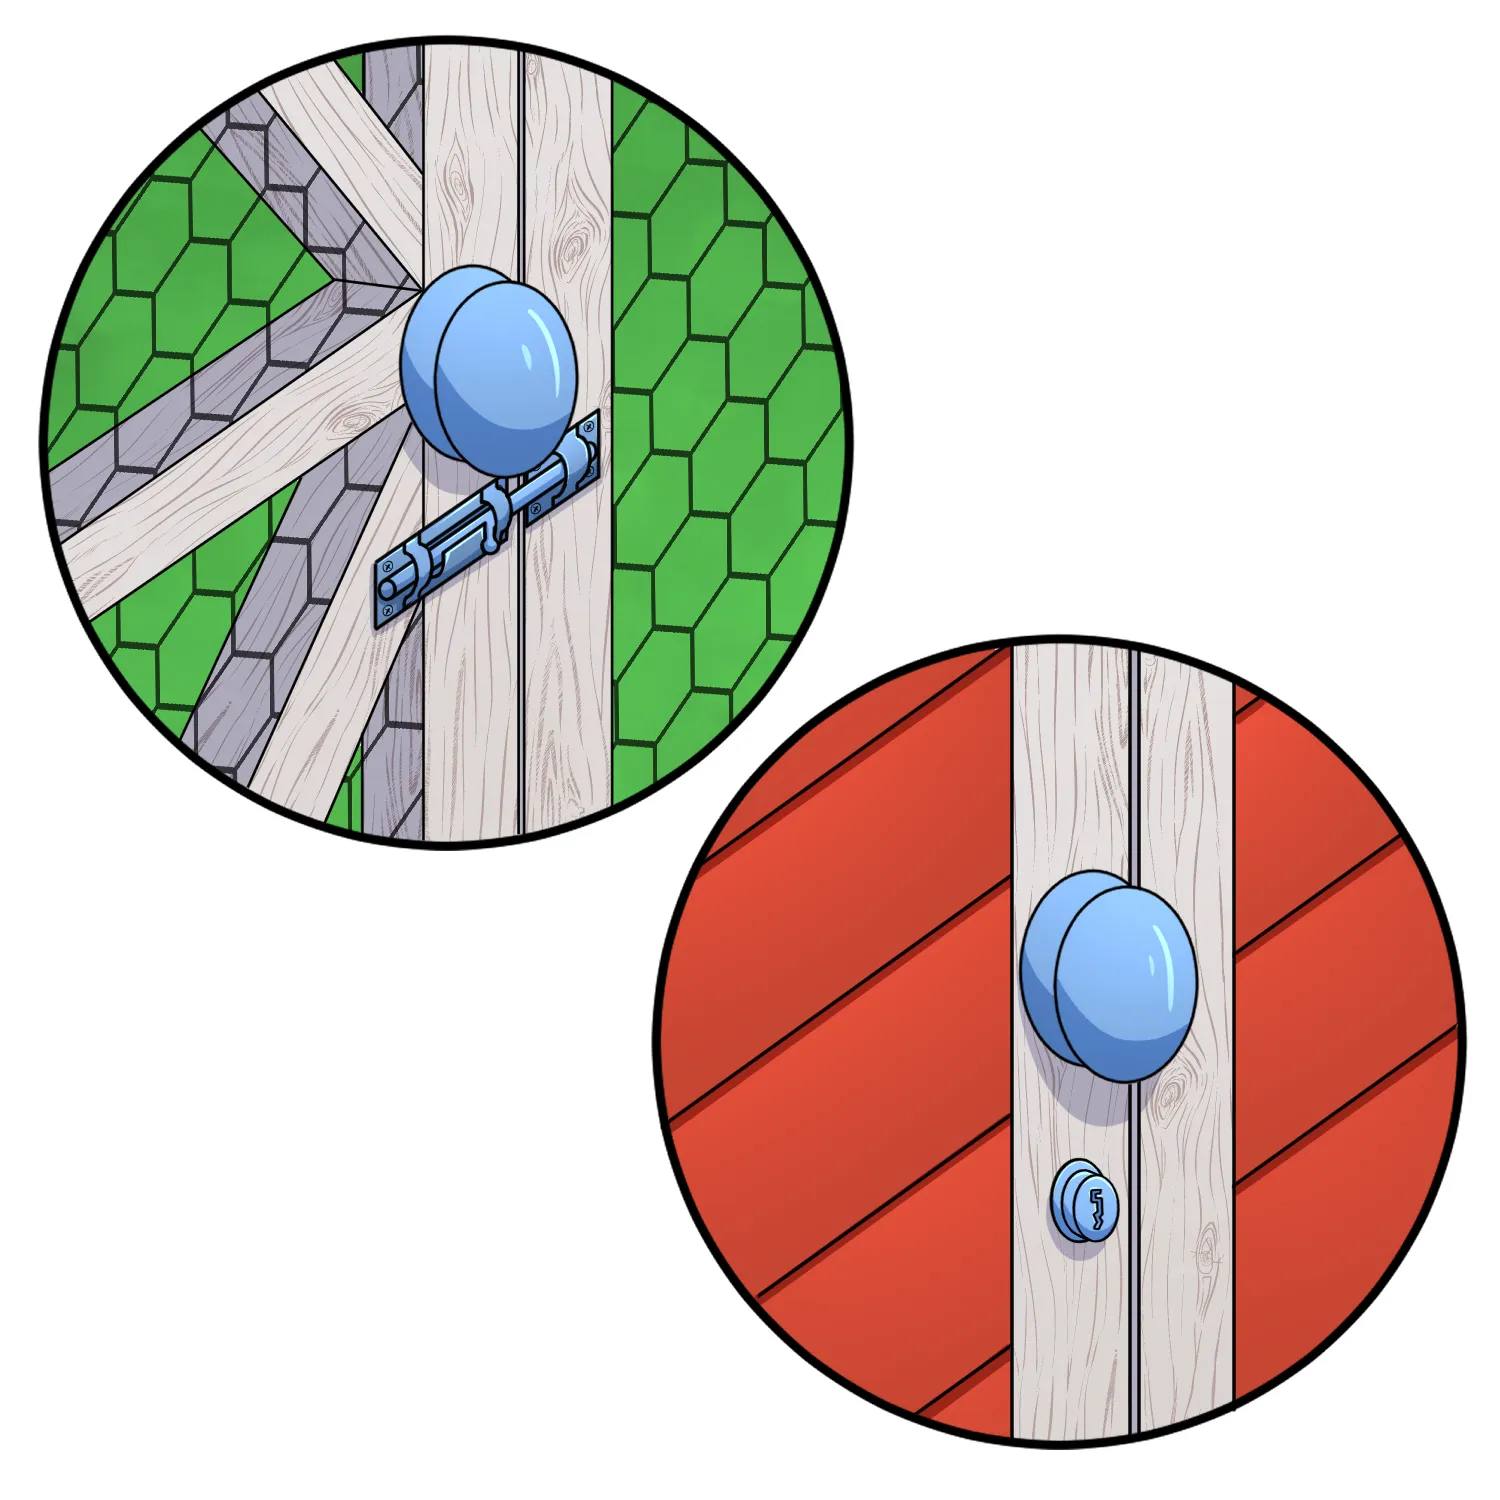
To deter a determined raccoon, use a lock that requires opposable thumbs to open. Such locks will prove bothersome, leaving predators with the option to leave.
Besides making your chicken coop predator-proof, you can tap on the benefits of deterrents like lights with a motion sensor, electric chicken fencing, and decoy animals.
Although the effectiveness of these deterrents varies, combining them with proven methods can ensure you don’t lose any of your birds to predators.
https://easycoops.com/predator-proof-chicken-coop
Harvesting rain and groundwater for your greenhouse is environmentally friendly and efficient. Steps and considerations for harvesting rain and groundwater for our greenhouse:
The optimal slope or angle for French drain collection pipes to ensure good water flow typically ranges between 1% and 2%. This slope allows water to move efficiently along the pipe without creating too much speed that could lead to erosion or an insufficient gradient that causes water to stagnate.
Here’s a brief explanation:
1% Slope: This is a gentler slope, suitable for areas with light to moderate rainfall. It ensures steady water flow but might require a longer drainage path.
2% Slope: This is a slightly steeper slope, allowing for effective drainage in areas with heavier rainfall. It provides quicker water movement but may be prone to erosion if not properly managed.
To calculate the necessary slope, divide the vertical drop (elevation change) by the horizontal distance. For example, if you have a 10-foot run and want a 1% slope, the drop would be 0.01 * 10 feet = 0.1 feet (or 1.2 inches).
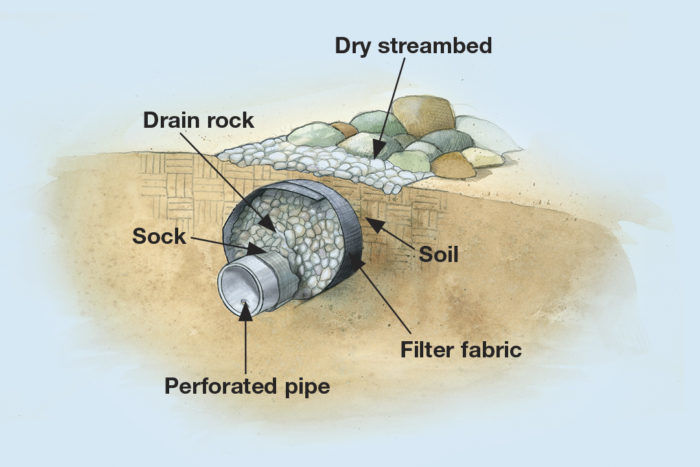
Keep in mind that these are general guidelines, and the specific conditions of your site, soil type, and local rainfall patterns may influence the optimal slope for your French drain system. It’s crucial to ensure proper installation and backfilling with gravel to allow water to enter the perforated pipes effectively.
Calculating the size of the cistern needed for your rainwater harvesting system involves estimating the total volume of water you plan to capture and store. Here’s a general guideline to help you calculate the size of the cistern:
As an example calculation:
Cistern Size=(Roof Area×Average Annual Rainfall×Efficiency Factor)−Water Usage NeedsCistern Size=(Roof Area×Average Annual Rainfall×Efficiency Factor)−Water Usage Needs
Keep in mind that these are general guidelines, and it’s essential to tailor the calculation to your specific conditions and requirements. Consulting with a local water conservation or rainwater harvesting expert can provide valuable insights for your particular situation.
A float switch is a type of level sensor, a device used to detect the level of liquid within a tank. The switch may be used to control a pump, as an indicator, an alarm, or to control other devices. One type of float switch uses a mercury switch inside a hinged float.
Such As:
AquaMiracle Pond Aeration Kit Koi Pond Aerator Pond Air Pump for Pond up to 15000 Gallons Pond Deicer All-in-One Pond Aeration System with Self-Sinking Airline Flow Control Rubber Air Diffuse: $149 (Amazon)