Transfer Data from Old Phone to New Phone

Transferring data from an old phone to a new iPhone is pretty straightforward, and Apple provides a few different methods to make it easy.

Here are the best ways to transfer data:

1. Using Quick Start (Best Method for iPhone-to-iPhone Transfer)

  • What you need: Both old and new iPhones, and both should be running iOS 11 or later.
  • Steps:
    1. Turn on your new iPhone and place it near your old iPhone.
    2. The Quick Start screen will appear on your old iPhone, prompting you to use your Apple ID for the setup.
    3. Scan the animation on your new iPhone with the old iPhone (using the camera).
    4. Follow the prompts to transfer your data (this can include apps, photos, settings, etc.). You can transfer everything from your old device, including apps and media.

2. Using iCloud Backup

  • What you need: A stable Wi-Fi connection and enough iCloud storage space.
  • Steps:
    1. On your old iPhone, go to Settings > [your name] > iCloud > iCloud Backup and tap Back Up Now to make sure your latest data is saved.
    2. When setting up your new iPhone, choose Restore from iCloud Backup during the setup process.
    3. Sign in to your Apple ID, choose the most recent backup, and let the device restore.

3. Using iTunes or Finder (for Older macOS or Windows Users)

  • What you need: A Mac or Windows computer with the latest version of iTunes (for macOS Mojave or earlier) or Finder (for macOS Catalina and later).
  • Steps:
    1. Connect your old iPhone to the computer and open iTunes (or Finder for macOS Catalina and later).
    2. Select your iPhone, and then click Back Up Now under the Backups section.
    3. Once the backup is complete, connect your new iPhone to the same computer.
    4. When prompted, choose Restore from Backup and select the most recent backup you made from your old device.

4. Using a Cable (iPhone-to-iPhone Transfer via Lightning-to-USB Cable)

  • What you need: A Lightning-to-USB cable to connect your old iPhone to your new iPhone.
  • Steps:
    1. Connect your old iPhone to your new iPhone using the appropriate cable.
    2. When the Quick Start screen appears, follow the prompts to transfer your data directly.

5. Transfer from Android to iPhone (Using Move to iOS App)

  • What you need: Your old Android phone, the new iPhone, and the Move to iOS app installed on your Android device.
  • Steps:
    1. On your Android phone, download and open the Move to iOS app from the Google Play Store.
    2. On your new iPhone, during the setup process, select Move Data from Android.
    3. Follow the on-screen instructions to connect the devices and transfer your data (contacts, messages, photos, etc.).

Tip: Make sure both phones are fully charged, or keep them plugged into power sources during the transfer to avoid interruptions.

Transfer from Android to iPhone using the Move to iOS App:

What you’ll need:

  • Both phones: Your dad’s Android phone and the new iPhone.
  • Wi-Fi connection: Both phones need to be connected to the same Wi-Fi network during the transfer.
  • The Move to iOS app: This app needs to be installed on the Android phone.

Steps to transfer:

  1. Install the Move to iOS app on your dad’s Android phone:
    • Go to the Google Play Store on the Android device.
    • Search for Move to iOS and install the app.
  2. Set up the new iPhone:
    • Start setting up the new iPhone as usual.
    • When you reach the Apps & Data screen during the setup process, select Move Data from Android.
  3. Connect the devices:
    • Open the Move to iOS app on the Android phone.
    • Tap Next, and follow the instructions.
    • On the iPhone, you’ll see a 6-10 digit code appear on the screen.
    • Enter that code into the Android phone.
  4. Transfer data:
    • The Android phone will connect to the iPhone over Wi-Fi.
    • You’ll be asked to select which types of data to transfer (e.g., contacts, message history, photos, videos, web bookmarks, and apps that are available on the App Store).
    • Once selected, tap Next and the data transfer will begin. The time it takes will depend on the amount of data being transferred.
  5. Finish setup:
    • Once the transfer is complete, tap Done on the Android phone.
    • On the iPhone, finish setting up the rest of the device, including logging into your dad’s Apple ID and setting preferences.
    • Any apps that were transferred will need to be installed from the App Store (the ones that aren’t automatically available on iOS).

Note:

  • WhatsApp messages and other apps that don’t transfer via the Move to iOS app might need separate transfers or manual setups.
  • If there are specific apps on the Android phone that are not available on iOS, you’ll need to find alternatives or transfer any relevant data manually.

This method works well for transferring most types of data and is relatively easy.

Gas Burner: Extinction Pop


If the gas in the burner is moving fast enough, the gas can’t burn down inside the burner and must burn on top of the burner where it should. If it’s moving too slowly (as it is when the gas is shut off) there is a tendency for the gas to burn down inside the burner tube, causing the extinction pop.

So you probably need to lool for ways to increase the gas flow through the burner a bit — by checking to make sure you have a properly sized burner orifice, proper manifold gas pressure and a properly adjusted and clean primary air shutter.

This is not generally a hazard —just an annoyance.

If your gas burner doesn’t immediately turn off when you switch it off and then “explodes,” it likely means there’s a buildup of gas around the burner due to a faulty valve or a clogged burner port, causing a sudden ignition when enough gas accumulates and finds an ignition source, which could be a spark from the igniter or even just a nearby flame; this is a serious safety concern and you should immediately turn off the gas supply to your stove and call a professional appliance repair technician to diagnose and fix the issue. 

Possible reasons for this problem:

  • Faulty burner valve:The valve might not be closing completely, allowing gas to continue leaking even when the knob is turned off. 
  • Clogged burner ports:Grease or debris can build up in the burner holes, disrupting the gas flow and causing uneven burning or delayed ignition. 
  • Damaged flame spreader:The metal plate distributing the flame could be damaged, causing gas to escape unevenly. 
  • Faulty thermocouple:This safety device, which keeps the gas valve open when a flame is present, might be malfunctioning, allowing gas to continue flowing even when the flame is extinguished. 

What to do:

  • Turn off the gas supply:Immediately locate the gas shut-off valve under your stove or near your gas line and turn it off. 
  • Do not attempt to light the burner:Do not try to light the burner yourself as this could worsen the situation. 
  • Ventilate the area:Open windows and doors to air out the kitchen. 
  • Call a professional:Contact a licensed appliance repair technician to diagnose and fix the problem. 

Important safety points to remember:

  • Never ignore gas leaks: If you smell gas, evacuate your home immediately and call the gas company. 
  • Regular maintenance: Clean your stovetop regularly to prevent buildup of grease and food debris on the burner. 
  • Inspect burner components: Check the burner ports for clogs and ensure the flame spreader is properly seated. 

Ring Doorbell

Flashing Blue Light on Ring Wired Doorbell Plus (formerly Video Doorbell Pro) After Installation

If you’ve just installed a Ring Wired Doorbell Plus and there’s a blue circle flashing on the front of the doorbell, it means the internal power cell is charging. You will have to wait until the charging process is complete before continuing setting your doorbell up.

Once the internal power cell is fully charged the blue light will no longer flash. The device will move into Setup Mode, and the light will spin.

After the Ring Video Doorbell is set up, it can take up to an hour for it to be fully charged.  

Learn more about Ring Wired Doorbell Plus light patterns.

Furniture Cleaning: Gummy Residue

  1. Using a chip brush, swirl in acetone over a small area
  2. Wipe away (in direction of grain) with sturdy paper towel
  3. Clean with warm water and Dawn dish soap
  4. Wipe dry
  5. Final clean and condition with Murphy’s Oil Soap

Work in small sections at a time until surface is completely clean and reconditioned.

Candy Lane Thermostat

Thermostat Manual

WiFi Reset
Change or Reset the WiFi Connection on My WiFi Series Touchscreen Programmable Thermostat

A basic WiFi reset can be completed by removing the thermostat face plate from the wall plate for 30 seconds and then reattaching it. The thermostat will then attempt to reconnect to the previously configured WiFi network. To connect to a new WiFi network:

TH8320WF / RTH8580WF – Proceed to step 1 to “forget” the current WiFi configuration and connect to a new network. If your thermostat is already registered to your account, step 2 and step 3 are not required.

TH8321WF – On the thermostat screen, select Menu – WiFi setup. Press the down arrow until “Disconnect WiFi network?” is displayed and select Yes.

Connecting your thermostat to WiFi can be performed during the initial setup and configuration, or later at a time you choose.

Connecting to WiFi – Initial Setup:

After the Configuration step during the initial install, you will be prompted to connect your VisionPRO WiFi 8000 to your Home WiFi.

The VisionPRO WiFi 8000 (TH8321WF) can be connected to WiFi on the thermostat itself after initial setup / configuration, or from the Menu > WiFi Setup screen. After successful connection, register your product on the mytotalconnectcomfort.com/portal website to complete the process and control the thermostat remotely.

The VisionPRO WiFi 8000 (RTH8580WF / TH8320WF) uses a 3-step connection and registration process

Step 1 – Connect your mobile device to the thermostat’s WiFi network (NewThermostatxxxxxx)

Step 2 – Connect the thermostat to your home WiFi (via an internet browser on your mobile device)

Step 3 – Register with Honeywell / resideo. (Performed in the My Total Connect Comfort web portal)

*Registration cannot be performed with the mobile app, currently only supported via the web portal*

  • Step 1 – Connecting your mobile device to the thermostat’s WiFi network (NewThermostatxxxxxx)Once installed and configured, the (TH8320WF / RTH8580WF) thermostat will display “WiFi Setup”. Open the Settings – WiFi on your mobile device and connect to the WiFi network named “NewThermostatxxxxxx”.*If your thermostat does not display WiFi Setup remove the thermostat faceplate from the wall plate for 30 seconds and then reattach it. If WiFi setup does not display, enter the Installer Setup (press the System button, then hold the center blank box at the bottom of the thermostat display for 5-10 seconds until the screen changes) and use the User / Installation Guide to navigate the settings to function 0890 . Make sure function 0890 is set to 1, then proceed to function 0900. Use the up or down arrow to change function 0900 function to 0 then press done. WiFi setup will then be displayed on the screen. Return to step 1.***TH8321WF – After initial configuration, you will be prompted to connect to WiFi. Select your Home WiFi network, then enter the password on your thermostat screen**
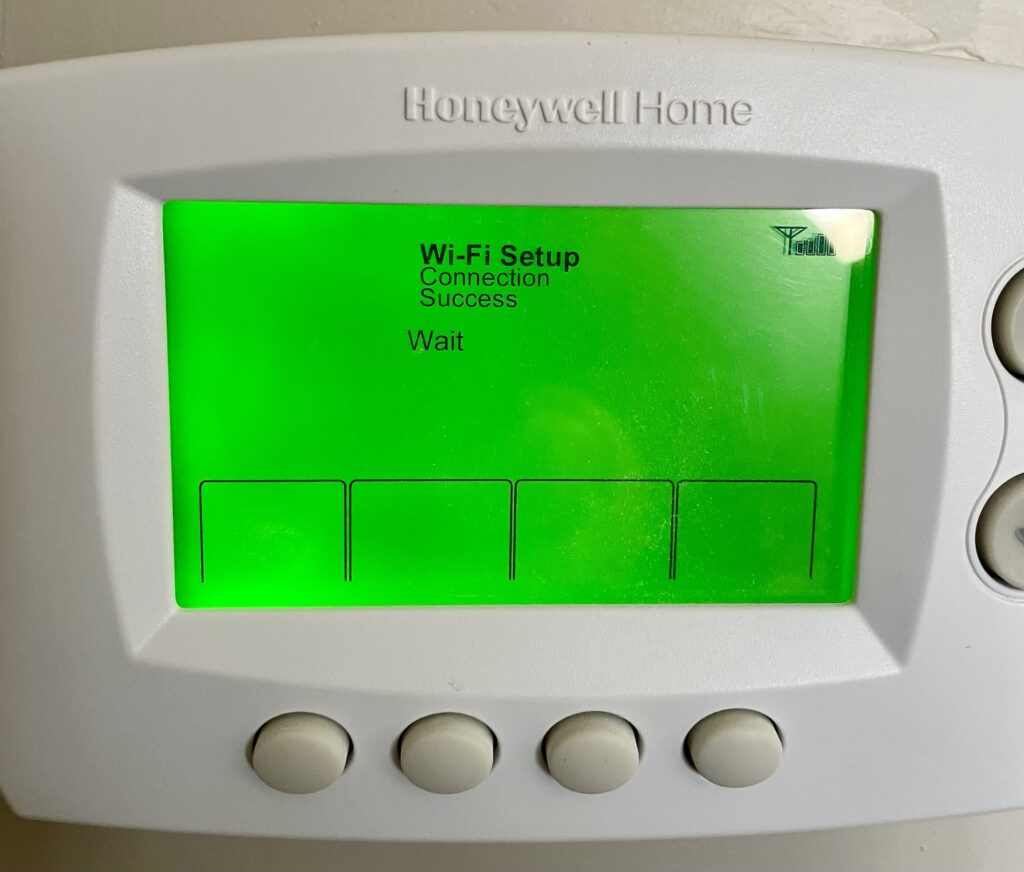
  • Step 2 – Connect the thermostat to your home WiFi (via an internet browser on your mobile device)Skip this step for the TH8321WF.TH8320WF / RTH8580WF – After connecting to the thermostat WiFi, open a web browser (Safari, Chrome, etc.) You should be automatically guided to a page labeled “Thermostat WiFi Setup. If you are not automatically guided there, enter the IP address: 192.168.1.1 into the address bar on your browser to navigate there manually.You should see your Home WiFi network listed. Select it and enter your WiFi password. After a brief connection period, your thermostat will display a “Connection Success” message. Reconnect your phone to your home WiFi network if your device does not reconnect automatically*If you do not see your home WiFi network, refresh the list. If your WiFi network is still not displayed, check the Trouble Connecting? / WiFi network recommendations below.*
  • Step 3 – Register at mytotalconnectcomfort.com/portalRegistration is completed at mytotalconnectcomfort.com/portal. Navigate to the page and create an account / login.Select the “Add Device” icon and Input the MAC ID / CRC for your device. (MAC ID / CRC are located on your thermostat information card, on the back of the thermostat, or from the Menu > Equipment Status screen])Complete the security check (if prompted) and follow the directions within the web portal to complete the registration.

https://www.honeywellhome.com/us/en/support/how-do-i-change-or-reset-the-wifi-connection-on-my-rth8500wf-wifi-series-wifi-touchscreen/

Greenworks 80V 18″ Brushless Cordless Chainsaw

Greenworks Chainsaw Manual (Downloaded from Amazon)
Greenworks Chainsaw Manual – Including Replacement Parts Info (Emailed from Greenworks Rep)